Tensorflow is an open-source framework for running machine learning algorithms. It is a framework to bring the ideas of machine learning to a working model. Recently I did a Specialization course on TensorFlow on Coursera and I have become a fan of it. It uses python language and its ease of use with Google Colab made it even a pleasure to work with.
While learning in Google Colab I was also trying it on my local machine to check the time it consumes, because bought a new laptop with the latest intel core chips and 4GB Nvidia GEFORCE GTX graphics card. I was happy with the CPU performance. More I started reading about NLP practices and algorithms found more examples that run better in GPU and faster which I tried in Google Colab. Then when I ran the same thing hoping it gives better performance I found it was only running on CPU not GPU. And it requires drivers to be installed. So in this article, I will cover the installation procedure I followed on my Ubuntu 18.04 to get Tensorflow working on my local GPU.
The steps I have followed is mentioned on the official website:
Step 1 — Installing Nvidia Drivers:
Execute the below command:
sudo ubuntu-drivers devicesFrom there we will get to know which is the recommended one. Go with the recommended one in the below steps.
Open Software Updates → Select Additional Drivers →Select Nvidia driver(Recommended) →apply changes to install the drivers →once it's done restart the system.
Then check if the Nvidia is being used by running below command:
prime-select queryI have followed this link to come up with the above steps.
Step 2 — Installing Tensorflow 2.1
The steps are as follows. I had followed this link to set up mine.
#Installing python virtual environment:
sudo apt-get install python3-venv -y#Create virtual env
python3 -m venv venv#Activate the newly created environment venv
source ./venv/bin/activate#Updating pip
pip install -U pip#Update setuptools:
pip install -U setuptools#Install tensorflow:
pip install tensorflow
Step 3— Cuda Installation:
CUDA (Compute Unified Device Architecture) is a parallel computing platform and API model created by Nvidia.
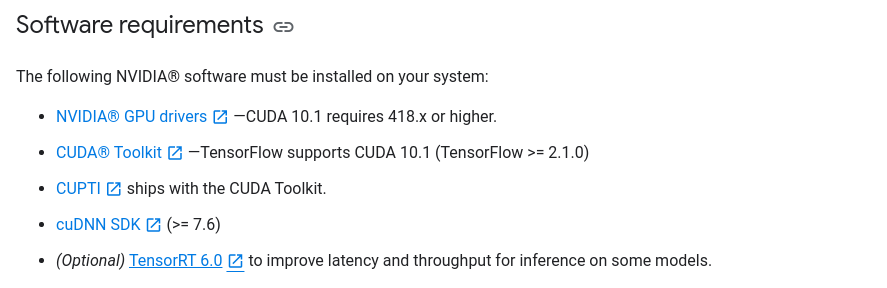
Currently, Tensorflow 2.1 supports CUDA 10.1, though at the time of writing this article CUDA 10.2 is available, do not install 10.2 version, because it is incompatible. I have tried and failed. Version Compatability is as below:

After finding the Cuda toolkit archive, select 10.1 version and select the options according to your systems. For my system I followed the below:
Linux →x86_64 →ubuntu →18.04 →deb[Network]
After this, you will be getting a list of commands to execute. Execute it. These are the list as per my systems:
wget "https://developer.download.nvidia.com/compute/cuda/repos/ubuntu1804/x86_64/cuda-repo-ubuntu1804_10.1.105-1_amd64.deb"sudo dpkg -i cuda-repo-ubuntu1804_10.1.105-1_amd64.debsudo apt-key adv --fetch-keys https://developer.download.nvidia.com/compute/cuda/repos/ubuntu1804/x86_64/7fa2af80.pub
sudo apt-get update #dont forget to put the version number. If not it will download 10.2
sudo apt-get install cuda-10-1
Step 4 — Installing NVIDIA cuDNN:
cuDNN is a CUDA Deep Neural Network library is a GPU-accelerated library of primitives for deep neural networks. cuDNN provides highly tuned implementations for standard routines such as forward and backward convolution, pooling, normalization, and activation layers.
go to the website login with your social id or Nvidia account if you have, after entering you will be getting something like below:

On selecting the CUDA 10.1 version Download the below files:

Install it one after the other in order with
sudo dpkg -i ${each file name one after the other}Step 5 — Installing TensorRT
NVIDIA TensorRT™ is an SDK for high-performance deep learning inference. It includes a deep learning inference optimizer and runtime that delivers low latency and high-throughput for deep learning inference applications.
Go to the link and then download TensorRT 6 by clicking on it. Then follow below commands:
sudo dpkg -i nv-tensorrt-repo-ubuntu1804-cuda10.1-trt6.0.1.5-ga-20190913_1-1_amd64.debsudo apt-key add /var/nv-tensorrt-repo-cuda10.1-trt6.0.1.5-ga-20190913/7fa2af80.pubsudo apt-get update
sudo apt-get install tensorrt
This completes the installation steps. It is time-consuming steps, especially the drivers. I have tried it a number of times. I have struggled for drivers installation because once it is installed, there is no proper way to undo it, so I had to reinstall Ubuntu every time I did a mistake.
Next step is to test whether Tensorflow is actually using GPU:
import tensorflow as tf#allow growth to take up minimal resources
config = tf.compat.v1.ConfigProto()
config.gpu_options.allow_growth = Truesess = tf.compat.v1.Session(config=config)
This should give results something like this:

So yes this is it, complete process to test your local Ubuntu machine which is using GPU when a TensorFlow program is run.
I am very excited to explore more things on Tensorflow and will continue exploring new things on this. The intention of me trying the above was to run a BERT program locally. I am still working on it but happy to see that my system is not crashing if I run a program that almost consumed my CPU and RAM completely and was freezing the OS operation. At least that is not happing now.